Oven 2.0


Hello again, all.  It really doesn’t seem like two minutes since I was sharing with you the processes of putting together my first portable medieval oven.  After two years of wonderful productivity (and a very steep learning curve) the little clay oven finally gave itself a Viking funeral.   Taking notes of the mistakes I had made previously, I quickly procured a successor and set about getting Oven 2.0 up and running.  For anyone hoping to do the same, here is a revised guide to setting up a practical, productive and above all long lived portable oven setup.

Step 1: Procure your oven

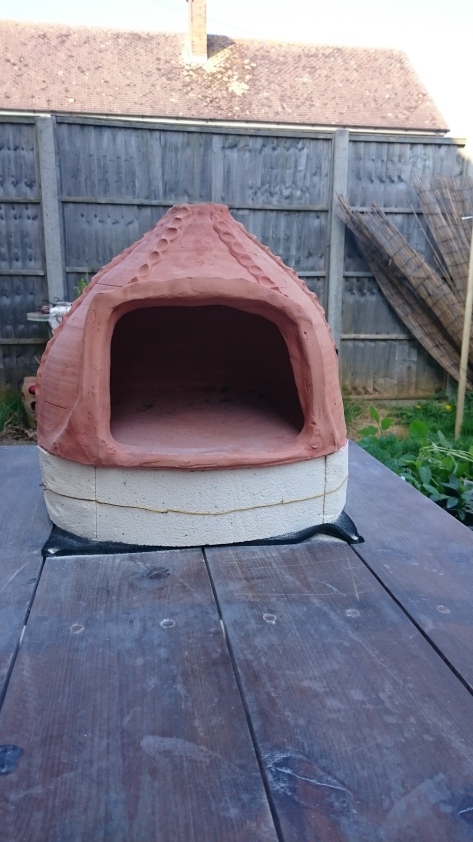
I used a fabulous terracotta clay inner from Trinity Court Potteries who were the people who also made  my last one. Using a pre-fired inner is a bit of a cheat but it essentially cuts out a step and makes life a whole lot easier.

Step 2: Give it a place to live

Being clay, once it has been used to cook a few times, your oven will inevitably crack. Do not let this worry you, it is the nature of the material that it is made from and an unfortunate fact of life when it comes to clay ovens.  In order to preserve its lifespan it needs a solid base. This base can be used to transport the oven as a solid unit and makes life a whole lot easier.  An important consideration however is that the oven (being an oven) will get incredibly hot and if not properly insulated will burn through the table (see “Viking funeral”).

Step 3: Get your kit together

DSC_1907

Once you have your oven liner and a suitable table or trestle, you will need:

A piece of carbon fibre ‘slack blanket’ proofed to 1300 degrees C

As many insulated kiln bricks (NOT fire bricks) as will fit under the oven in a single layer

Brass picture or craft wire; sturdy but not so firm that you can’t twist it. It is important to use brass or copper as it reacts well with heat and won’t oxidise and cause problems like ferrous metals will.

A bag of browning plaster; this generally comes in large bags but don’t be put off by the amount. You will use a surprising amount and also need some left over for running repairs during the life of the oven.

Straw; the usual pet bedding stuff will do nicely

Brass carpet tacks

A hacksaw; make sure that it is deep enough to cut through the bricks

Pliers

A suitable container to mix plaster in (I used my wheelbarrow)

A drill

A file

A marker pen

Dust mask

Safety goggles

Step 4: Make a start

Start by fixing the slack blanket onto the table top. This is the last line of defence for the wood of the table, it is also important that it does not shift about and cause the oven to come loose. Make sure that the piece is not too large as it will show from under the plaster and look messy.

_20170501_110057

Step 5: Bricks

Place the kiln bricks on the blanket and put the oven on top. With your marker pen, mark out the shape of the oven, then take the oven off again so that you can get to the bricks.

_20170501_110142

The bricks can then be removed and sawn into shape. Kiln bricks are very light and can easily be cut with a hacksaw.  This will produce a lot of dust so don’t forget the mask and goggles.

When the bricks are roughly shaped (I used the corners cut off the back ones to fill the gap at the front), use the file to neaten up the edges and give a neat finish.

DSC_1915

Step 6: Secure the base

Secure the kiln bricks in place with brass wire, again to ensure that they do not move. It is not necessary to secure them through the table, but make sure that they are wrapped tightly. When that is done, place the oven on top.
DSC_1918

Step 7: Secure it to the table

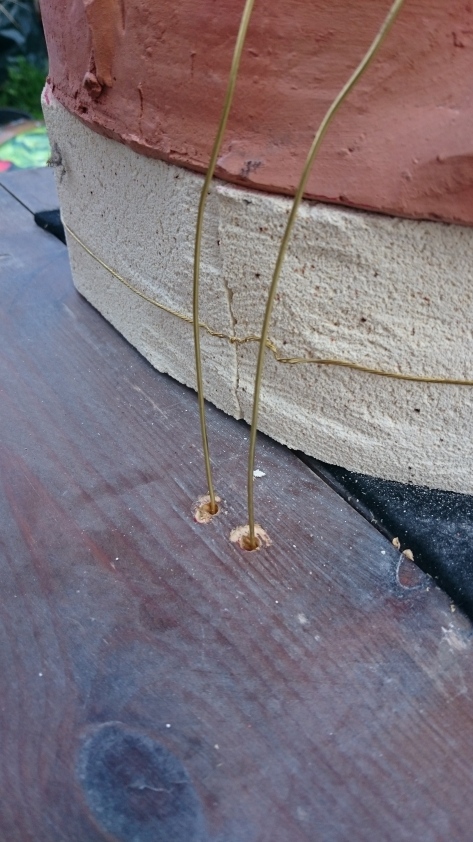
Drill holes in pairs around the perimeter of the kiln bricks. I drilled pairs a 2 and 10 o’ clock and at 6 o’clock.
DSC_1919

Wrap the brass wire around the oven and through the table so that it is firmly attached. When it is firmly attached and there is no movement whatsoever when pushed, twist the wire to secure it firmly and nip off the ends to give a neat finish.

DSC_1920

Step 8: Plaster

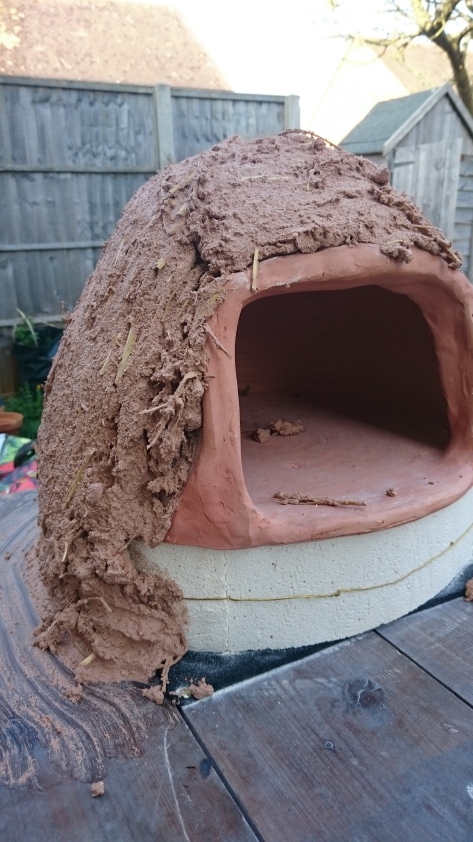
In a large container, mix the plaster with water and a few handfuls of straw to a thick , smooth consistency (a stick should be able to stand up in it but it shouldn’t look ‘biscuitty’ in any way).

DSC_1924

When mixed, apply it to the oven starting at the bottom and working up.
DSC_1923

Keep going until you have a layer at least an inch thick, maybe more.

DSC_1927

Step 9: Patience

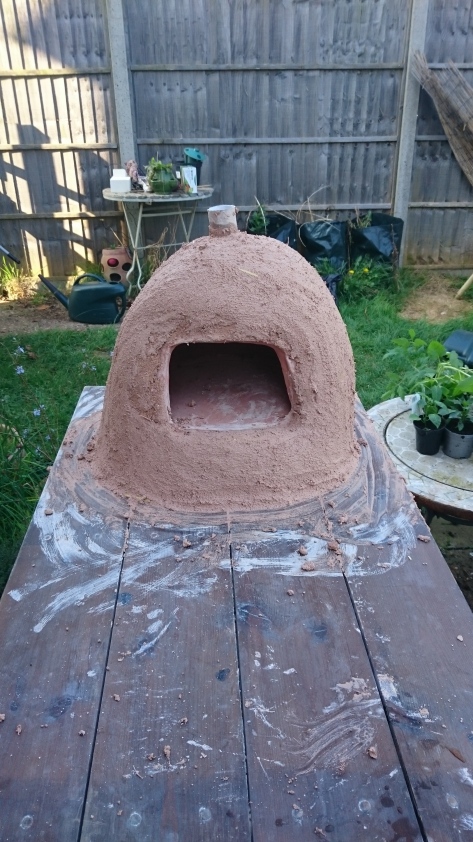
When plastered, leave your oven to dry for at least a week.  Resist the urge to fire it until it has dried out for a good while as this will cause your oven to crack very badly. I have put a loo roll tube into the chimney to stop plaster falling in.
DSC_1925

Step 10: Fire (see section on laying a fire for more info on this)

Once the oven has dried out, lay a small fire in the centre of the oven and keep it burning for about half an hour.

IMG-20170415-WA0002

After this time, gradually increase the size of the fire by adding bigger sticks . Resist the urge to try and cook anything at this time, the oven needs to dry out first. Be particularly vigilant in making sure that the underside of the table remains cool. If you have done your job correctly, it should get no hotter than a warm cup of tea after a sustained burn.  When the moisture starts to leave the plaster, the oven will start to steam and you may find condensation will form on the underside of the table.

DSC_1933

Note the steam forming over the dome


Let the fire burn out after about an hour. Repeat this step for as many times as you are able to dry the plaster (I did it three times over three days), after which time your oven should be ready to cook.

_20170501_111125

Episode 3: Very Basic Bread

The adventures of the little oven continue…

Having completely dried the plaster and given the oven a few test firings, I then decided to be brave and attempt to cook in it.  I decided to go for the simplest of simple dough for a first outing as I didn’t want to risk annihilating anything special should anything go wrong.  So far this blog has covered setting up a small clay oven with a ready fired ceramic inner onto a portable stand however the following principles should be the same for a wood fired clay oven of any size and sort.  Because of the small size of this oven, I opted for the ‘fire out’ method of cooking, using radiated heat from the dome and floor rather than the direct heat of a fire.

Be Prepared

For cooking in your oven you will need a basic kit of:

  • Something to scrape the embers out of the oven with. I use a small brass scraper from a fireplace tool set but anything you find works well should be fine. Just make sure that it is long enough to reach the back of your oven without you burning yourself. The scraper can also double nicely as a poker, should you need to poke the fire as the oven heats.
  • Something to put the dough into the oven on and take the bread out. I use a large wooden spatula as my oven is small but should your oven be large enough there is a wide selection of bread and pizza peels on the market. The fish slice from a barbecue set also works well. Again, just make sure that it is long enough to reach the back of the oven without you getting your hands burned. Also if you are using a smaller oven, make sure that your peel fits through the door!
  • A small brush to sweep up stray ash with.  Some wood fired oven users also advocate using a brush or mop to sweep the cinders out of the oven before baking but personally I prefer the old Italian method of giving the flat of the peel (or spatula) a couple of gentle taps on the oven floor. This sends most stray ash to the sides or out of the chimney.
  •  Something fireproof to scrape the hot embers into when the fire is taken out of the oven. I use an old ceramic skillet (also made by Trinity Court!) however a metal ash shovel from a fireplace set or any other fireproof container that won’t result in burned hands is fine.
  • A place to safely put the hot embers. An empty barbecue or fire box should do fine for this. Remember that it is likely during sustained cooking that you will at some point have to put your fire back in to bring the oven back up to temperature  and the best way of doing this is to put a shovel of hot coals back. Don’t completely extinguish them unless you are certain that you won’t need them again.
  • Something to put over the chimney.  Heat rises and so the chimney is the place where you will lose heat quickest. You can also use the chimney to regulate the heat in your oven so make sure that whatever you use to block the chimney is fireproof and won’t burn your hands when you touch it. I used a wooden bannister knob soaked it water. It scorches but is basically ok.
  • Something to use as an oven glove.  I used an old linen cloth which I mainly used for putting the door on and taking it off.
  • A good supply of pre-chopped sticks.  There is little more annoying than having to go and chop more sticks when you are busy with other things.
The basic kit of spatula, scraper, ceramic skillet, brush and wooden knob!

The basic kit of spatula, scraper, ceramic skillet, brush and wooden knob!

Next, you need something to cook.

For the very first baking session I decided to use a basically ‘sacrificial’ dough; nothing that I would be too upset if it spoiled but perfectly edible if all turned out well. I used a basic crusty dinner roll dough from Paul Hollywood’s “How to Bake” book consisting of:

500g strong bread flour

20g unsalted butter

10g fast action yeast

10g salt

320ml of tepid water

  • Incorporate all your ingredients and knead the dough until it is elastic.
  • Leave to prove in a warm place for a hour or more.
  • Then, when the dough has at least doubled in size,
  • knead again to knock the air out.  Form it into balls (remember that they will at least double in size so make sure they will fit through your oven door!) and leave to prove on a tray for another hour or more.
  • After you have left the dough to prove for a second time, light your oven. Each oven is different and unique so as you use yours you will get to know how long your particular oven takes to heat up. Mine I have discovered takes about an hour to get to temperature with a decently hot fire inside it.

As in the previous chapter, tend your fire gently and try and keep it well supplied with sticks to provide a good bed of embers.  You may notice the oven dome going black with soot, don’t worry about this as it is completely normal.  When the oven dome reaches approximately 400 degrees Centigrade, the soot will start to burn off. You will know when this is happening as the flames will turn a dark orange and a small amount of bitter smelling black smoke will come from the chimney.  Again, do not panic as this is exactly what you want to happen at this stage.  When the inside of the dome is burned clean (this can be ascertained by carefully peeking through the door) the oven is up to temperature.

  • Make sure that your dough is ready.
  • Allow the fire to burn mainly to embers.
This oven is ready to have the embers taken out.

This oven is ready to have the embers taken out.

  • Take the fire out of the oven by using the scraper to scrape the embers into your container, then tip them into the safe, fireproof place (in my case a firebox). Get the oven floor as clean as possible with the scraper.

What comes next may seem a little counter-intuitive as before you put your bread in, you need to let the oven cool. In letting it cool down a little, it evens out any hotspots caused by the fire and gives you a nice, even baking environment. If you put your bread into an oven that is too hot, you will end up with bread that it burned on the outside and raw dough in the middle.

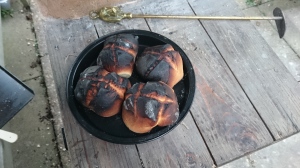
This is what happens if your oven is too hot!

This is what happens if your oven is too hot!

I opted for the somewhat hazardous and old fashioned method of gauging temperature by holding my hand in the centre of the oven and seeing how long I would keep it there.  In the end I discovered that 4 ‘mississipis’ was the right temperature for bread.  Again though, see what works for you as what is one ‘mississippi’ for one person, may be three to someone else!

  • Pat the oven floor with the flat of your spatula a couple of times to waft away any stray ash.
  • Cut crosses in the top of your bread rolls, put flour on your peel or spatula and scrape up the roll, being careful not to deform it.
  • Place the roll in the oven by sliding the dough off the peel or spatula with a brisk ‘forward and back’ jerk.  I found that my oven can accommodate 4 bread rolls very nicely.
  • When the rolls are in the oven, put the door on and plug the chimney to retain the heat.
All plugged up with its door and chimney knob!

All plugged up with its door and chimney knob!

  • Check the rolls after 5 minutes to make sure they are not burning. The easiest way of doing this is peeping down the chimney.  The rolls should take 8-10 minutes depending on their size (bigger takes longer) and are done when they sound hollow when tapped on the bottom.
  • When done, remove the rolls from the oven by scooping them onto a floured spatula or peel.
  • Leave the bread to cool.

I find that my oven keeps hot enough for two lots of rolls to cook without putting the fire back in, however you may find yours can cook more or less depending on its size and how it retains the heat.  If you find that the oven loses heat before the second batch is done, don’t worry.  Take the bread out and put the fire back in to bring the oven back up to temperature.  When it is back up, repeat the first steps and replace the bread back in the oven.  Also remember that putting things in your oven cools it down and so the second batch of bread will take longer to cook than the first.

When you have finished cooking, this is a good time to use some  freshly mixed plaster to patch any cracks that have appeared during this firing.  You may even find that you have lost lumps of plaster from around the chimney and the door. Don’t panic, just put fresh plaster down when the oven is cool enough to touch safely.

Enjoy your lovely fresh bread!

Lovely fresh bread from your own wood fired oven.

Lovely fresh bread from your own wood fired oven.

Next time… Pies!

(yet to be attempted so watch this space!)

Episode 2: The first firing.

The ongoing adventures of a tiny clay oven.

After the oven spent a week drying on the dining room floor and generally being in the way, the time came to fire it.  At this point, the plaster was still damp as browning plaster takes a long while to dry, especially if it is very thickly laid so being an impatient soul I took the decision to fire it and see what happened.

For the very first firing of the oven you will need:

  • An appropriate trestle or table to stand the oven on; placing it on the floor is impractical but remember that you mustn’t mind whatever you place it in possibly getting scorched and it must also be capable of bearing the weight of the oven. Be careful!
  • A good supply of fine sticks about half an inch square, if not finer.
  • ‘Clean’ kindling such as hay or sawdust. Any chemical accelerants such as firelighters or lighting gel give off gases that will never quite burn off and taint your food and newspaper gives a fine ‘floaty’ ash that tends to stick to the oven floor.
  • A fine day or a safe cover, just in case it rains. (I used a tall, fire resistant canvas patio umbrella. Don’t ever use your oven indoors or in an enclosed space such as a tent or near anything flammable. Be sensible!)
  • Matches (or if you are feeling very brave, a flint and steel but that will be covered at a later date!)
  • A mugful (or equivalent) of mixed (but strawless) plaster to patch cracks as they appear.

First lay your fire

Lay your fire inside the oven like a good campfire, with kindling in the centre, then a ‘wigwam’ of very, very fine sticks, grading outwards with the thickest on the outside so that the wood falls into the fire as the centre burns away. This should give you a good even burn for the first stage of the fire and give you a good bed of embers that will keep things going until the oven is up to temperature.  Leave the chimney and the door unobstructed.

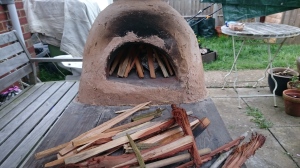
The fire laid for lighting. Note thickness of the sticks.

The fire laid for lighting. Note thickness of the sticks.

Fire it up!

Light your fire.  A single match should do it but there is no shame in using three or four.  When you see the kindling catch, leave it be and let the fire catch the sticks.  Keep an eye on things and gently blow on the glowing parts of the wood until the flames reappear.  When the flames come back, stop blowing.

Let the fire catch and resist the urge to fiddle with it!

Let the fire catch and resist the urge to fiddle with it!

When the fire catches, it is likely that flame will come from the chimney and the door. Don’t panic! Let the fire burn down and add more wood when needed, two or three sticks at a time. This will give you a nice bed of embers that will keep the fire going nicely.  There is no need to add more sticks when the flames are coming out of the door or top.

Don't panic!

Don’t panic!

The oven will be damp at this time so it will have to burn for a while to get hot. Be patient with it.  When it begins to heat, the plaster (and also more than likely the ceramic inner) will crack.  This is normal and do not let it worry you.  Use your ready mixed browning plaster to smooth over the larger cracks when they appear and be careful not to burn yourself as you do so. You may also find that as the plaster dries out it will lift from the trestle, again just smooth over it with the ready mixed plaster.  Make sure that the plaster is not too runny however as it may dribble to the surface to the ceramic and cause the inner to crack, the ‘margerine’ consistency mentioned in the previous entry should do fine.  Patching the oven is going to be a regular thing throughout its life, get used to it!  Keep your fire in for an hour or two in order to let the heat permeate.

Hold your nose

As the browning plaster dries, steam will rise from the surface of the oven.  This is normal but be warned that as the browning plaster dries the smell is quite terrible!

Patience grasshopper

The oven will need a couple of fires in it over the course of a few days to dry the plaster out so that it no longer smells when fired.  Resist the urge to cook in it at this stage as the stinky steam may make the food taste nasty.  Also, resist the urge to use the oven in inclement weather as the the plaster may start to come off.  additionally, avoid any rapid heat exchange (for example, something very cold touching very hot) as this may cause the ceramic to shatter. Treat it gently, feed it well and you will be fine.

Next time… The first bake!

A Clay Oven: The Beginning

Years ago, I bought a small terracotta oven inner from the magnificent Trinity Court Potteries (http://www.trinitycourtpotteries.co.uk/) to make a portable oven to take to reenactments. For years it acted as a small roundabout in our living room , collecting fluff when finally a couple of weeks ago, I decided to act.

This is the story of my small oven and its journey towards baking bread.

The terracotta liner is a bit of a cheat as to my knowledge, no such pre-made inners existed in the middle ages however it is in essence, baked clay and so that in itself is not too much of a crime against authenticity.  For true clay oven building techniques using sticks and daub there are many fine websites and instructional manuals out there that will tell you how to do so.

To set the portable oven up for baking you will need:

  • A Trinity Court terracotta clay oven.
  • A wooden board or trestle
  • Some brass or copper wire
  • A sack of browning plaster
  • A few handfuls of straw, cut up short
  • Two 2″x1″ blocks of wood, approximately 12″ long (optional)
  • Lots of patience

First, you need a base for your oven.  Most wood fired ovens have the luxury of a permanent home but the portable nature of this oven means that it needs a solid base to sit on, otherwise you may well end up weeping over the cracked remains of your deceased oven pretty quickly.  I used an old trestle table from my reenactment kit but there are good instructions for making one (and more good tips for setting the oven up)  here http://jpgsawyer.weebly.com/uploads/7/4/7/3/7473762/oven.pdf .

When I first set the oven on the trestle, I made the mistake of not putting any plaster beneath it and turned part of my table to charcoal, so don’t forget to sit it on a bed of plaster.

Here is how I set the oven up:

Decide where on the trestle your oven is going to go. 

I decided to place my oven at the far end of the trestle, leaving the other end free for putting things on, proving dough and acting as a work surface. I then marked the position by drawing around the base with chalk.

Decide how you are going to fix the oven to the table.

I went for wiring it to the table with 2mm brass jewellery wire as the wire will be exposed to heat, moisture and a heavily alkaline environment due to the plaster and brass does not corrode as readily as ferrous metal.  It was then decided that the best way to fix it to this particular trestle was to drill holes at 2, 10, 4 and 8 o’ clock points.

Mix the plaster and straw

Put 2 litres of water in a large container that you don’t mind being spoiled.  Then slowly add browning plaster, stirring as you go until you have a consistency resembling soft margarine. When this consistency is reached, add the chopped up straw a handful at a time, stirring slowly with a stick as you go. Continue until there is an even spread of straw throughout the mixture. You should need no more than two handfuls of straw to achieve this.  Don’t worry if you run out, you can always make more up should you need to.

Set the oven on its trestle and fix it in place

A bed of plaster and straw about 1cm thick was set down, then the two wooden blocks set down to give strength to the base.  More plaster was set down to cover the blocks, giving a raised plaster base beneath the whole of the oven of about 1.5 inches thick. The wire was then wrapped around the chimney of the oven and through the drilled holes.  It was then twisted up and over itself to secure the oven firmly to the base. There must be no movement of the oven whatsoever.

The oven inner, wired to its trestle. (Note lack of plaster layer beneath, this is pre-charcoal table!)

The oven inner, wired to its trestle. (Note lack of plaster layer beneath, this is pre-charcoal table!)

Plaster the top and sides 

Continue plastering until the  top and sides are covered in a layer of plaster at least an inch deep. Remember that you are relying on the plaster to not only protect your oven from rapid exchanges of heat but also to insulate it and keep heat in long enough for you to cook.

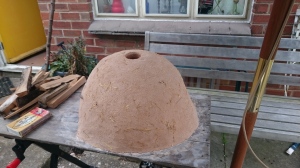
The oven on its trestle, wearing its new clothes.  Note that the plaster covering is slightly deeper than the height of the chimney.

The oven on its trestle, wearing its new clothes. Note that the plaster covering is slightly deeper than the height of the chimney.

After this, leave the oven to dry naturally for approximately 7 days, patching any cracks as they appear with more plaster mix (minus straw).

Next step: Firing for the first time and cooking!